The radiation shield — that white plastic louvered housing that holds your temperature and humidity sensor — is one of the most misunderstood components of a personal weather station. It looks simple, but where and how you mount it determines whether your temperature readings are accurate or garbage. This guide covers every rule that matters, why each one exists, and what happens when you break them.
What a Radiation Shield Does (And Why It Needs Help)
A radiation shield blocks direct sunlight and thermal radiation from the sensor inside it. The louvered design allows air to flow freely through while blocking line-of-sight to the sun and to warm surfaces below. The shield itself is painted or molded white to reflect rather than absorb solar radiation.
Here's the problem: if airflow through the shield is slow or nonexistent — because it's mounted in a corner, too close to a wall, or on a calm day — the air inside the shield heats up from the plastic itself. Even a white shield absorbs some radiation. Without airflow, the sensor inside reads the temperature of the trapped air inside the shield, not the ambient air temperature. This is called daytime radiation error, and it's the reason professionally sited stations use actively aspirated shields (battery-powered fans that force air through) while consumer stations rely on natural ventilation — which means placement matters enormously.
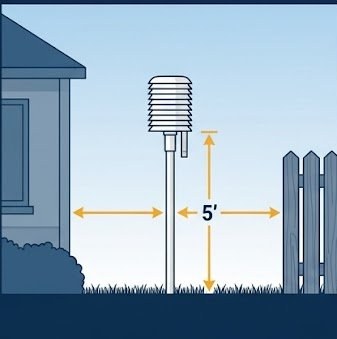
Rule 1 — Height: 1.25 to 2 Meters Above Ground
The World Meteorological Organization standard for air temperature measurement is a sensor height of 1.25 to 2 meters above a level, open, grass surface (roughly 4 to 6.5 feet). This standard exists because the temperature profile of the atmosphere changes significantly near the ground — especially on calm, clear nights, when a cold air layer forms just above the surface that can be several degrees colder than the air at face height.
For consumer weather stations, the practical target is 5 feet (1.5 meters) above natural ground level. This height:
- Is above the worst of the surface cold pool that forms on calm clear nights
- Is below the influence of most nearby obstructions
- Is representative of the air temperature a person standing nearby would experience
- Places the sensor close enough to the ground that it stays within the CWOP quality control tolerances
Mounting at 8–12 feet (common when sensors are placed on a fence or low post) is acceptable and still produces useful data. Mounting at 20+ feet, at roof level, or on a chimney is strongly discouraged — you are no longer measuring surface air temperature at that height.
Rule 2 — Distance from Paved and Hard Surfaces
Asphalt, concrete, brick, and gravel all absorb solar radiation during the day and re-emit it as heat at night. This thermal re-emission warms the air directly above these surfaces significantly above the true ambient temperature. The effect is called the urban heat island effect at city scale, but it occurs at backyard scale too.
The standard guidance is to keep the radiation shield at least 30 feet (10 meters) from any large paved surface. In practice, few suburban yards allow this distance. The practical rules:
| Surface Type | Minimum Distance | Worst-Case Error if Ignored |
|---|---|---|
| Large asphalt surface (driveway, road) | 30 ft preferred, 15 ft minimum | 3–8°F high on sunny afternoons |
| Concrete patio or walkway | 10 ft minimum | 2–5°F high |
| Brick or stone wall (south-facing) | 15 ft minimum | 4–10°F high in late afternoon |
| Gravel or rock mulch | 6 ft minimum | 1–3°F high |
| Short grass or bare soil | No minimum (ideal surface) | Negligible |
Rule 3 — The 4:1 Rule for Obstructions
For any nearby obstruction — a fence, wall, building, hedge, or shed — the distance between the obstruction and your sensor should be at least 4 times the height of the obstruction. This is called the 4:1 rule.
- A 6-foot privacy fence: sensor must be at least 24 feet away
- A 10-foot wall or building: sensor must be at least 40 feet away
- A 20-foot garage: sensor must be at least 80 feet away
The 4:1 rule addresses two separate effects. First, obstructions shade the area on their north side, causing artificially low temperatures during certain times of day. Second, sun-facing walls heat up and re-radiate, warming the air on their south and west sides. By staying 4:1, you're clear of both the shade zone and the re-radiation zone.
Rule 4 — Surface Beneath the Sensor
The ideal surface beneath a radiation shield is short, well-watered grass. Grass acts as a natural thermostat — transpiration keeps the surface cool and the local air temperature close to true ambient. The WMO standard for official stations mandates a grass surface for exactly this reason.
Realistic alternatives for home stations, ranked best to worst:
- Short grass (ideal)
- Bare soil
- Mulch (organic, not rubber or gravel)
- Groundcover plants
- Pea gravel (significant heat absorption — adds 1–3°F error on hot days)
- Concrete or asphalt (not recommended within 30 feet)
Rule 5 — Airflow Around the Shield
The shield needs unrestricted horizontal airflow from all directions. Never mount it:
- Inside a garage, shed, or enclosed space
- Inside a hedge, bush, or dense vegetation
- In a corner where two walls meet
- Directly against a wall or fence (even a mesh fence interferes with airflow)
- Under an eave or overhang (the overhang traps radiant heat from the roof)
If you must mount near a structure, mount the sensor on the north side of the structure in the northern hemisphere. The north side receives no direct sun, minimizing the re-radiation effect. This is far better than south or west-facing placement, which captures hours of afternoon solar heating.
Real-World Example: What Goes Wrong
A common setup that seems reasonable but is actually poor: mounting the entire weather station (anemometer on top, radiation shield in the middle, rain gauge at the bottom) on a single pole attached to a south-facing deck railing, over a concrete patio, at a height of 8 feet. On a clear July afternoon, this setup typically reads 8–14°F higher than actual air temperature. The sensor is baking in re-radiated heat from both the concrete patio below and the deck surface beside it, with no airflow from the south due to the deck structure.
The same station moved to a free-standing pole over grass, 20 feet from the deck, at 5-foot height, will immediately drop to within 1–2°F of actual ambient temperature. No new sensors needed — placement alone fixes it.
Passive vs. Aspirated Radiation Shields
All consumer weather stations ship with passive radiation shields — the multi-louvered white plastic design that relies entirely on natural air movement to ventilate the sensor. These work well when placed correctly and when there is some ambient wind. On dead-calm, clear afternoons, even a correctly placed passive shield can read 1–3°F high.
Aspirated radiation shields add a battery-powered or solar-powered fan that continuously draws outside air across the sensor. Products like the Ecowitt WH32B with aspirated shield or third-party aspirated shields from Barani Design reduce daytime radiation error to under 0.5°F even on calm days. They cost $40–$120 as accessories and make a noticeable difference for temperature-critical applications like agriculture or climate monitoring.
For most home observers, correct passive shield placement gives acceptably accurate results. For gardeners, beekeepers, or anyone making daily decisions based on their station's temperature, an aspirated shield is worth the investment.
How to Check If Your Current Placement Is Good
Compare your station's temperature against the nearest official NWS ASOS station during nighttime hours (2–5 AM), when surface heating effects are minimal. If your station reads within 2°F of the ASOS at night but runs 5–10°F high in the afternoon, you have a radiation/placement problem. If you're 5°F off at night, you may have a sensor calibration issue. The distinction matters for diagnosing the correct fix.
Find your nearest ASOS station via the Iowa Environmental Mesonet station finder (mesonet.agron.iastate.edu) — it shows current obs from hundreds of NWS and FAA stations across the US with 1-minute updates.
The Ambient Weather WS-2902 WiFi Smart Weather Station is Amazon's Choice in this category — over 12,000 verified reviews, 2,000+ purchases per month, and currently at its lowest price in 30 days. It includes a full 5-in-1 outdoor sensor array, indoor color console display, Wi-Fi connectivity, and uploads to Weather Underground, Weather Cloud, and the Ambient Weather Network out of the box. A complete kit at a competitive price.
View on Amazon →As an Amazon Associate, StationSense earns from qualifying purchases at no additional cost to you.
Frequently Asked Questions
Place the sensor as far from structures as possible, prioritizing the north or northeast side of any nearby building (least solar exposure). Mount over grass or soil if at all possible. Keep it 5–6 feet off the ground. Note the placement limitation in your WU and CWOP station descriptions — this honest reporting actually improves the data quality system's ability to use your data correctly. An imperfectly placed station that's honest about its limitations is far more valuable than one with overstated accuracy claims.
Multi-louvered radiation shields are omnidirectional — they're designed to work regardless of orientation. The louvered design blocks direct sunlight from any angle while allowing airflow from all directions. If your shield has a single large opening at the bottom (like a funnel-style design), face that opening northward in the northern hemisphere to avoid direct solar exposure into the opening. But standard cylindrical or dome-style louvered shields have no preferred orientation.
Consistently low nighttime readings are usually a placement issue, not a sensor error. Two common causes: (1) Your station is in a low-lying area or depression where cold air pools at night — cold air is denser and flows downhill, collecting in low spots. If you're in a valley, hollow, or even just a slight yard depression, you'll consistently read colder than stations on flat or elevated terrain. (2) Your station is surrounded by vegetation that traps cold air at night. Moving the sensor to a more elevated or open spot typically corrects this.
Ideally, no. The optimal anemometer height (10 meters / 33 feet for wind speed comparability to official data) is far too high for a temperature sensor. Most consumer all-in-one stations mount everything together as a practical compromise — typically at 5–7 feet. If you're mounting a standalone temperature sensor (like an Ecowitt WH32 or similar remote sensor), keep it at 5 feet over grass, separated from the anemometer mast. The separation avoids the anemometer mast creating a minor wind shadow that can reduce airflow through the shield.