Of all the sensors in a personal weather station, the rain gauge is the most placement-sensitive and the most frequently misread. Temperature errors announce themselves — a reading of 98°F on a 72°F day is obviously wrong. Rain gauge errors are subtle: you get 0.42 inches when the actual total was 0.61 inches, and you have no way of knowing unless you deliberately check against a reference. This guide covers every placement decision that determines whether your rainfall measurements are reliable.
How Tipping Bucket Rain Gauges Work — and Where They Fail
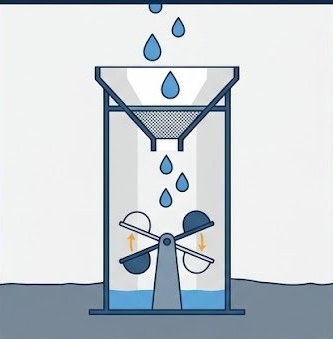
Virtually every consumer weather station ships with a tipping bucket rain gauge. Rain falls into a funnel that channels it into one of two small buckets on a pivot. When a bucket fills to a calibrated amount (0.01 inch for most consumer stations), it tips, draining that bucket and moving the other into position. Each tip sends a signal to the station console or gateway, which accumulates tips into a rainfall total.
The calibration is fixed at the factory — typically 0.01 inch (0.2mm) per tip. This means every placement error translates directly into a systematic bias in every rain measurement your station ever records. There is no firmware fix for a gauge mounted in a wind shadow. There is no calibration offset that accounts for splash from a nearby wall. The physics happen before the electronics ever get involved.
Rule 1 — The 2:1 Obstruction Rule for Rain Gauges
Rain gauges use a less restrictive obstruction rule than temperature sensors because the physics are different. Where temperature sensors need the 4:1 rule (distance = 4× obstacle height) to avoid thermal re-radiation, rain gauges use the 2:1 rule: the gauge should be at least twice the height of any surrounding obstruction away from that obstruction.
A 10-foot fence requires the gauge to be at least 20 feet away. A 20-foot garage requires 40 feet. The reason: close obstructions create two separate problems. On their windward side, they cause turbulence that deflects falling rain away from the gauge funnel — causing undercatch. On their leeward side, they create wind shadows that change the angle at which rain arrives — also causing undercatch in different conditions. Staying 2× away keeps the gauge in the undisturbed airflow zone for most wind directions.
However, there's a nuance the 2:1 rule doesn't fully capture: very tall, nearby obstructions like a house can shelter the gauge from directly overhead rain when precipitation falls at an angle during high-wind events. If your best available location has an obstruction to the south and southwest — the direction of most moisture-bearing storms in the continental US — that's a more serious problem than one to the north.
Rule 2 — Height Above Ground: 2 to 4 Feet Maximum
Consumer rain gauges should be mounted 2 to 4 feet (60–120 cm) above natural ground level. This contradicts the intuition that higher is better — it is not, for rain gauges.
The reason height matters inversely from what you'd expect: wind speed increases with height. A gauge at 10 feet sees much higher wind speeds than one at 3 feet, and higher wind speeds mean worse undercatch. Every additional foot of height exposes the gauge to more wind, reducing catch efficiency in breezy and stormy conditions. The WMO standard for rain gauge height is specifically 30 cm (12 inches) above ground for research-grade gauges, though that's impractical for consumer stations because debris and splash from the ground surface would contaminate readings. The practical home station target is 3 feet (90 cm).
Mounting the rain gauge at the same height as the anemometer (which may be 5–8 feet) is a very common consumer mistake. The all-in-one station design encourages this because the whole assembly is on one pole — but if you have any option to separate the rain gauge mount from the anemometer, lower the gauge to 3 feet over grass.
Rule 3 — Splash Distance from Hard Surfaces
Rain hitting a hard surface splashes upward, and some of those droplets land in the rain gauge funnel. This causes overcounting — the gauge records more rain than actually fell. The effect is most pronounced during heavy rain on concrete or pavement and can add 5–15% to your totals during intense events.
The standard guidance: keep the gauge at least 5 feet (1.5 meters) horizontally from any hard surface — concrete patios, driveways, decks, gravel paths, or flat roofs visible from the gauge. If your station is all-in-one on a deck, move it to a free-standing pole over grass as soon as possible. Short grass or bare soil causes negligible splash; water hitting soil is largely absorbed rather than reflected.
| Surface Type | Min Distance | Splash Error if Too Close |
|---|---|---|
| Concrete / paved driveway | 8 ft preferred, 5 ft minimum | +8–15% overcatch in heavy rain |
| Wooden deck | 5 ft minimum | +5–10% overcatch |
| Gravel / pea stone | 3 ft minimum | +3–6% overcatch |
| Short grass or bare soil | No minimum — ideal surface | Negligible |
| Nearby roof overhang / eave | Never mount under an overhang | Severe undercatch — drip from roof adds, direct rain blocked |
Rule 4 — Keep the Funnel Level
A rain gauge funnel that isn't perfectly level will channel rain preferentially to one side, allowing the tipping bucket to fill faster than intended and causing systematic overcounting. A 5-degree tilt can add 2–4% to readings. A 10-degree tilt — which is easy to achieve on an improperly tightened pole bracket — can add 8–12%.
Use a bubble level (or a phone level app) to verify the funnel is perfectly horizontal in two perpendicular axes before finalizing your mount. Check it again after the first hard freeze-thaw cycle, when frost heave can rotate a ground-mounted pole. An annual spring check of gauge level is good maintenance practice.
Rule 5 — Keep the Funnel Clean
Consumer funnel screens — the small mesh that sits over the opening — clog with pollen, leaf debris, bird droppings, and spider webs. A partially clogged funnel slows water flow into the tipping bucket, causing mild to severe undercatch during heavy rain when the funnel can't drain fast enough. In spring pollen season, a heavily clogged gauge can miss 20–30% of precipitation during intense short-duration storms.
Inspect and clean the funnel at minimum every 6 weeks during growing season, and after any major wind event that deposits debris. Cleaning is simple: remove the funnel cap, rinse the screen under running water, and replace. The tipping mechanism itself should be cleaned annually — gently remove the funnel assembly, rinse the pivot area, and verify the bucket tips freely with no resistance.
Real-World Placement Scenarios
Scenario A: Small Suburban Yard, House on One Side, Fence on Three Sides
This is the most common challenging setup. The house is 22 feet tall; the 2:1 rule requires 44 feet of clearance, which the yard doesn't have. The 6-foot fence on three sides requires 12 feet of clearance each way. In a 40×40 yard, the geometric center is the best available position — roughly 20 feet from house and 20 feet from fence. The 2:1 rule is technically not met for the house, but this is an acceptable compromise. Note the limitation in your WU and CWOP station descriptions: "Sub-optimal placement due to lot constraints; likely 8–12% undercatch in high-wind events."
Scenario B: Rural Property, Open Pasture Available
Straightforward — place the gauge in the most open area available, at 3 feet above short grass, with no obstructions within 40+ feet. This is a near-ideal WMO Class 1 placement. The only remaining consideration is wildlife: deer and cattle are curious and will investigate gauges at accessible heights. A 3-foot mount on a well-anchored ground stake is still accessible to deer. Consider a cage or relocation if your property has large animals with access to the gauge area.
Scenario C: Urban Rooftop Installation
A rooftop gauge is exposed to maximum wind and gets significant rooftop turbulence that causes severe undercatch in storm conditions. It also risks splash from HVAC condensate or air conditioning drains. Rooftop gauges are generally not recommended for accurate precipitation measurement; they're better suited for stations focused on wind and pressure monitoring. If rooftop is your only option, note severe placement limitations prominently.
Diagnosing Whether Your Current Placement Has Errors
Compare your station's cumulative monthly rainfall against the nearest CoCoRaHS observer in your county (cocorahs.org — the Community Collaborative Rain Hail and Snow Network uses standardized manual gauges read to 0.01 inch by trained volunteers). CoCoRaHS observers follow strict placement protocols, making them an excellent reference.
If your tipping bucket consistently reads 10–15% low versus a nearby CoCoRaHS observer, you likely have a wind exposure or funnel clog issue. If it consistently reads 5–10% high, check for splash from nearby hard surfaces. If it's random — sometimes high, sometimes low — the funnel is clogging intermittently. Any of these patterns can be corrected with the guidance above without buying new equipment.
Frequently Asked Questions
The funnel opening faces upward and is omnidirectional — it has no preferred orientation to face. What matters is that nothing is blocking the opening from above (no eave, no tree branch directly overhead) and that the funnel is level. Some gauges have a small overflow drain or electrical connector at the base that should face away from the prevailing wind direction to prevent splash intrusion, but this is a minor consideration.
Three common causes: (1) Funnel completely blocked — check for debris, pollen, or spider web; (2) Tipping mechanism jammed — gently tilt the gauge and listen/feel for the bucket to pivot freely; (3) The sensor cable between the rain gauge and the console/gateway became disconnected. Most consumer stations have a small phone-jack-style connector between the rain assembly and the electronics — check it's fully seated. On wireless stations, verify the sensor is still pairing to the gateway (WSView Plus will show the sensor's signal strength).
Yes, for most consumer tipping bucket gauges. Most have a small set screw on the underside of the tipping mechanism that adjusts the bucket volume. Clockwise raises the trigger point (gauge undercounts — fix by turning screw counterclockwise to lower trigger volume). Test by pouring measured water and counting tips as described above. Make small adjustments (quarter turn) and retest. Alternatively, most manufacturers' apps (WSView Plus, AmbientWeather.net) allow setting a software calibration factor — if your gauge consistently reads 8% low, apply a +8% calibration offset in the app settings without physically adjusting the mechanism.
No. Tipping bucket gauges drain automatically with each tip — that is the entire point of the tipping mechanism. There is nothing to empty. The only maintenance required is keeping the funnel and screen clear of debris. Unlike manual storage gauges (like the 4-inch plastic CoCoRaHS gauges that observers read daily), tipping bucket gauges are fully automated. Some stations display a cumulative daily or event total that you can reset, but the physical gauge drains itself.